How to Find and Develop Your Personal Photography Style (My In-Depth Guide)
My in-depth guide on how to find your photography style! (2022 Update)
Look:
Becoming a successful photographer starts with finding and developing your personal photography style. But still, a lot of new photographers tend to skip this step.
Why?
Mainly because it’s not easy to uncover one that you are happy to stick with for a long time. It takes diligent effort.
The good news is, it’s not rocket science if you know what you’re doing.
Without a doubt, if you want your photography experience to be rich, rewarding and exciting, it’s important that you develop a unique personal style.
One that resonates with you, your ideas and can ultimately help you take stunning photographs.
Now, contrary to popular belief, this isn’t an overnight process. It requires patience and focus to find one that you can be confident with.
After all, you need a personal favourite genre that will let you connect with your inner artist over a period of time.
For many, finding the style (that they can work with) is an on-going, creative process that they go through while evolving as a photographer.
The question is:
- How do you go about finding a style that gives your snaps an edge over the others?
- How do you really choose a photography genre that you won’t get bored with later on?
Here are few practical tips on how you can go about finding and developing your own, without complicating things.
In addition I’ll provide my tips on top 3 common genres: portraits, sports shots, and product photography.
(And I’ll share the best platforms/courses to invest in for each genre mentioned.)
Here’s a table of contents of what to expect today:
Table of Contents
How to Find Your Photography Style
-
Identify Your Core Goals
One of the factors that influences your photography style is what you actually want to achieve or accomplish with it.
The more clarity you have on your goal as a photographer, the easier it will be for you to find a way that makes your work stand out from the rest.
Ask yourself:
- Why did you get into photography in the first place?
- And where do you want to go from here?
- Is there something about it that you enjoy more than anything else?
Getting answers to these questions will lead you to get a better understanding of what you want to accomplish.
It will give you the much needed clarity and assurance.
Also, consider the market you want to make your name in. There are a ton of different markets you can target as a photographer – which one do you want to go after? And why?
Your goals are often a reflection of the segment you want to focus on, which makes them extremely important.
For example:
If you enjoy using your camera at weddings, then maybe that’s the direction you should focus on. Or if you enjoy wildlife photography, that’s what you should be pursuing.
Or perhaps you’re an avid angler interested in capturing your fishing trips?
Hell, you can even rock it with photographing the ants! Seriously.
I mean see below one of Andrey Pavlov’s work:

How crazy is that!?
Anyway…
Not all markets are the same, and not every niche will sound appealing to you. So be careful before selecting one. The goals you choose depend on it.
Defining your style becomes more feasible when you’re more connected with your goals. Which means you need to set them according to your long-term vision.
And feel confident with the ones you choose.
-
Find Inspiration, But Don’t Copy (Duh!)
Let’s face it, your photography style is yours.
Nobody can copy the essence of it, no matter how hard they try. They can never ever be the original. Which is exactly why you should avoid copying someone else’s style.
It simply won’t serve the purpose.
A copy will always remain a copy. It’ll lack the required depth. There’ll always be that “something is missing” feel to it. So yes, copying is without a doubt a bad idea.
But seeking inspiration?
Now, that’s something you can and should always try to do, especially when you’re starting out.
When you see one’s approach to photographing things (could be your favorite photographer or your next door neighbor) and instantly connect with it, take an idea from it. And blend it with your own ideas.
Instead of directly lifting off what they are doing, make it a part of your photography’s DNA.
You can enhance your style by adding more to it with the right amount of inspiration. Whether it’s how they blur the background, the way they use the flare lens or simply what they do with the lighting.
Find out what strikes you about their style and then use that particular element.
Inspiration is all you need.
Copying? Not so much.
-
Practice Every Single Day. For Real.
Truth is, photography is all about practice.
Every successful photographer will tell you that.
The more photos you tae, the easier it will be for you to discover a style that resonates with you. You’ll find that the right one comes out on its own if you simply try to use your camera more often.
You need to get into the habit of shooting at least one image day in and day out. That’s the only way to give your mind the space to identify an interesting photo-genre.
There are 365 days in a year.
Imagine what would happen if you clicked at least 365 photos over the year without fail. It may take only a few months before your efforts start getting rewarded.
But you’ll end up finding a style that is truly yours.
When you’re shooting on a regular basis, you’ll automatically see your shots leaning to one particular direction. That is your own, that nobody else has.
Portrait Photography Tips for Beginners

Portrait photography is both fun and tricky, but this is one such skill that can help pay your bills since people who are great at taking portrait photos are always in demand.
If you are just tapping into your photography passion or want to switch to portraits, you must learn and apply great portrait photography tips for beginners.
Generally, a good portrait captures the subject in an original way and makes them stand out. That can take some time to master, so continue reading as you will find some of the most important tips to get you started.
-
Be Familiar with the Camera and Its Settings
Rookie photographers are so bent on splurging on the most expensive cameras to get high-quality images that they completely forget the old saying in the photography world:
“The best camera is your own camera.”
Most cameras today can take exceptionally amazing Instagram-worthy portrait photos with background blur, but the truth of the matter is the key is to know how to get the camera to do that.
DSLR is obviously the best choice for beginners, but you can also work with filming cameras.
If you think you have the potential for portrait photography, you can even use an action camera.
Whichever name brand and model you have, you should know the settings for portraits. There are so many options in DSLR like shutter speed, aperture, lens, etc. that you can play with to make lifelike portraits.
==> Guide on the best prime lenses on a crop sensor for portraits.
Product | Tips & Reasons to Buy Today | |
35mm lens Best walkaround, versatile prime |
| |
50mm lens Best prime for a full frame camera |
| |
85mm lens Best cheap prime for portrait photos |
|
Give adequate time to study the settings and practice different combinations.
-
Get to Know Your Subject
Your subject is the most important part of the shoot.
People behave very differently in front of cameras, and some may be camera shy. The major part of the photography process is in your hands, but it is the subject that gives the input.
A professional portrait photographer would study their subject beforehand and understand their needs.
As an amateur, you should at least meet up with the model to assess his or her comfort level and desires.
-
Direct a Pose
This can be considered an extension of the above point.
When you meet your subject, you should also plan the pose you will be going for. This highly depends on the subject and the kind of portrait they want.
The pose is their way of expressing themselves, and that is vital to the portrait. For instance, if you are shooting a dancer, their pose should be flamboyant and weightless.
Overall, you should learn how to be a DIRECTOR. And that’s exactly what you can learn from this Complete Posing Workshop – it’s amazing.
-
Location is Very Important for the Final Result
While your subject can make or break how good the portrait turns out, do not forget the location you are shooting at. That too can have a tremendous effect on the shoot and the results.
This is especially true when shooting outdoors.
If you are shooting outdoors, make sure to take the weather and light into account.
For portraits, the best time to shoot outdoors is early morning or late afternoon.
That is because you do not want your subject to look like an incandescent bulb or the sun to produce rough shadows. So focus on the golden hours.
-
Focus on the Eyes
This is perhaps one of those portrait photography tips for beginners that easily get overlooked.
The eyes of the subject are the window into their soul, and a good portrait basically captures the soul. Look at any portrait from renowned photographers, and you will see a clear emphasis on the eyes.
(By the way, often they use reflectors to get that characteristic spark in the eyes of a model.)
-
Play with Angles
This may be a bit of a stretch for a beginner, but it is definitely worth trying.
The angle of the portrait can make a big difference to the end result. In fact, just a few degrees of movement can make it extraordinary. The light should be your main cue for changing angles. You can also change angles to focus on secondary features like lips or ears.
Your primary feature for a portrait is, of course, the eyes.
One technique that is used by professionals is zooming in on the feet to the face of the subject and keeping a focal length of 50mm. Then, take multiple shots from different angles so that you have ample variety.
This can also aid in the editing phase.
Take note though that if you are working with kids, changing angles again and again can be tricky.
-
Try Using Props
Surely, most of the impeccable portraits you have seen had no props.
However, you will be amazed to see how effortlessly professional photographers introduce props in their portraits without compromising the subject.
Props may include those that can aid your shoot like car reflectors or flashlights. For kids, it can be toys. For an artist, it can be a paintbrush. For a teenager, it can be a silly placard.
Let your creativity flow here, and you might just pull it off!
-
Shoot in RAW
You agree that portraits have to be special, right?
Well, shooting them in RAW format instead of the usual compressed JPEG format might just make them special. RAW-mode photos have more details and can be easier to edit later on.
Portraits are often printed out on large-sized canvases, so you want the quality to be astounding.
Shooting in RAW can also give you the chance to correct overexposed photos.
-
KISS
If you have ever taken a photography course, you would be familiar with the term KISS (Keep it Simple, Stupid).
As hackneyed as this term is in the world of photography, it could not be any more relevant for portraits. The simpler the composition of the portrait, the better the result would be.
The portrait should be about the subject and nothing else, which means everything else is just there to complement the subject. If they are overpowering the subject, let them go.
In fact, for most portrait shoots, it should be just you, the camera, and the subject.
Best Courses to Learn Portrait Photography
I believe that investing in premium courses will help you accelerate your growth.
Instead of wasting thousands of hours trying to find free stuff on the internet, you could just receive a step-by-step guidance from the world class experts.
If you feel you’re interested in portrait photography, here is my list of the best online courses to invest in.
If you’re into portraits or weddings, I highly recommend the SLR Lounge Membership (review). I’ve included 5 courses related to portraits below:
SLR Lounge – My #1 Recommendation!
- Family Photography 101
- Headshot Photography
- Complete Posing
- Engagement Photography 101
- Natural Light Couples Photography
Expert Photography
- Fairytale Portraits (e-course)
- Dreamy Childhood Portraits (e-book)
- Profit from Portraits (e-book)
KelbyOne, CreativeLive, MasterClass
- KelbyOne’s portrait photography courses
- Storytelling Through Portrait (Tyler Mitchell)
- Portrait Photography Bootcamp (Lindsay Adler)
I should mention that with the KelbyOne membership, you’ll have access to a VARIETY of courses for photographers (whether portraits or anything else).
But like I mentioned earlier, my top recommendation would be SLR Lounge.
It has an amazing lifetime membership plan that you can take advantage of and constantly learn from Pye Jirsa. Check it out!
Simple Product Photography Tips
==> The Ultimate Guide to Product Photography <==
First things first: what is product photography?
Product photography is a kind of photography that uses very specific techniques in order to showcase a product or products in a way that is not only attractive but is also able to entice any potential buyer towards purchasing it.
This kind of photography is essential not just for online advertising.
It’s also an important part of the offline advertising industry as well, which includes advertisements in brochures, billboards, catalogs, magazines, and several others wherein the manufacturer can directly sell to the consumer.
Note:
I published a post written by Ann Young, who’s a professional photographer specializes in portrait, wedding, commercial, and product photography for magazines, listings, advertising, etc.
==> Best cameras and lenses for product photography on the market right now.
The list includes cameras across different categories and budgets.
As a beginner, we understand that you might not have that much when it comes to the budget. We’ve all been there.
In that case, allow us to provide you with tips on how to do it without spending too much money.
-
You Can Use Your Smartphone
We know you expected us to say use some high-end fancy DSLR.
While that may be a great idea, it isn’t always necessary, especially when you are on a tight budget. So, if you do not own a DSLR, you can use your smartphone.
Unlike a couple of years ago, smartphones had cameras not more than five megapixels. Luckily, times have changed. These days, most phones boast either a 12- or 13-megapixel camera, sometimes even more.
(iPhone Photography School has a few courses in this niche.)
Moreover, some models also have incredible settings that can optimize your shots.
-
Always Use a Tripod
If you are using your smartphone, never ever prop your phone against something to capture the image of the product.
This make-shift setup is just too easy to slide off, causing obvious inconsistencies in the appearance of your photographs.
Similarly, holding your phone isn’t a great idea either. It may be fine if you need to click one or a handful of images. However, if you need to take more photographs as your business grows, it is very unlikely to have that consistency.
For this reason, owning a tripod is essential.
A tripod ensures that there is consistency in all of your product images. Furthermore, tripods are quite reasonably priced too. Investing in one won’t cause a hole in your pocket. When shooting on a smartphone, you can opt for either a traditional or a flexible tripod.
-
Choose the Right Light
Any photographer will tell you that the right lighting can make a world of a difference to the subject in an image. The correct light setting can help reveal some of the best features of the product that will entice the customer to buy it.
It is important to note that not one single setup of lighting will work for every product. In fact, incorrect lighting could have the opposite effect and actually weaken the appearance of the product.
For this, you could either shoot in natural or artificial light. Natural light is basically sunlight and also known as “soft light”.
==> The Ultimate Guide to Product Photography.
You should opt for natural light for your product when it is meant to be used outside, preferably used by a person, as people look better in natural light and when you want to also emphasize the surroundings of the product instead of just specific attributes.
Artificial lighting is more commonly used in most photography. In product photography, the photographer tends to use artificial lights when they want to highlight particular details of a product.
-
Background
Often, if not always, you will notice a clean white background for any product photography.
This typically looks the best as it naturally pulls the focus to the product. This is also known as the Infinity Curve, which allows the photographer to shoot the product against a white background that appears to be endless and also does not reveal any horizon in the back.
For a more cost-effective measure to achieve this, you can either use paper or fabric, white in color and bend it so that it creates a curve. Place the product in the center of the image, so that the audience’s attention automatically gets attracted to the product.
-
Try Multiple Angles
Sometimes, just clicking an image of the product head-on may not be the ideal thing to do. So, the best thing you can do is to try out multiple angles as you click the image. Don’t be afraid to be adventurous with this.
We would highly recommend trying close-ups of the product from different angles.
You never know which angle will be the most flattering and highlight the product well. Whatever angle you choose, though, ensure it still accurately reflects all the attributes of the product and is not deceiving.
-
Do Not Delete
You may often find yourself tempted to delete certain images right away when you feel they don’t fit the criteria you are after. However, you have to be patient.
You wouldn’t realize how the image appears once you upload it on to your computer and how it would look on a bigger screen. Sometimes, images that look average on the camera’s small screen may look phenomenal on a big screen.
-
Editing
Taking a photo of a product is just half the battle.
The next step is to edit it and give it some touch-ups. If you are uploading the images on a site, make sure that all of the image sizes stay the same, or at least approximately the same size.
For some basic editing, you don’t really need to be a tech whiz.
A simple editing app that you would find even on your phone would suffice. Applications such as Snapseed is a brilliant way to do some basic photo editing.
Great Courses to Learn Product Photography
- The Ultimate Guide to Product Photography (Ross Floyd & Aaron Nace)
- Craft Photography Fundamentals (Candice Stringham)
- Product Photography Mastery (Kelly Lawson)
I think these are some of the best product photography courses online that you’ll find right now.
Next up, shooting sports action.
Sports Photography Tips for Beginners
Sports photography is one of the few directions of photography, where the quality and high characteristics of photography equipment are of fundamental importance.
Shooting sports on the first random camera that you’ve chosen or using your smartphone won’t work as effectively.
After all, a sports camera needs:
- the fastest focusing possible,
- correct operation at high ISO if the shooting happens indoors in low-light conditions,
- perfect convenience in operation, and,
- lightning-fast reaction to the photographer’s actions.
In terms of the lens for sports photography, a high lens speed at very long focal lengths is required.
But first things first.
Let’s start with practical advice to becoming a better photographer, and then see what kind of equipment will allow you to shoot awesome sports-related photos.
It is important to understand that in sports you will be shooting a fast-moving object, and therefore, you’ll need to learn how to adjust your camera accordingly.
-
Camera Settings for Sports Shooting
Let’s begin with focusing.
See, a common flaw with sports is blurry photos. This is because the photographer isn’t able to focus on the object.
In order to reduce the number of blurry images, you need to set up the autofocus system correctly.
In any modern digital camera there are at least two focusing modes:
- AF-S (Auto Focus Single), and,
- AF-C (Auto Focus Continuous).
We need the second one.
It will allow you to continuously monitor the athlete moving in space, without losing the image sharpness.
In Nikon digital cameras, the continuous focusing mode is highlighted as AF-C.
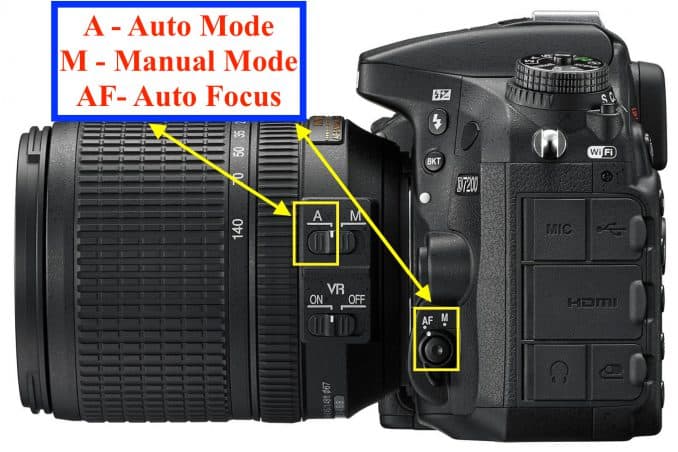
In the AF-C mode, the camera will continuously focus on the selected focus point.
-
Use the 3D Tracking Mode
However, one focus point is small, and the photographer can’t always keep the focus point on a fast moving object.
So, what then?
In all modern Nikon devices there are two very useful functions: Dynamic AF-Area and 3D Tracking mode.
Dynamic AF-Area Mode (“AF Point Expansion” in Canon) allows you not to lose the object in case it went beyond the initial focus point.
Automation will independently search for an object, focusing on neighboring focus points.
3D Tracking Mode is the one that uses a special scene-recognition system and allows your camera to automatically activate as many focus points as needed to monitor subject movement.
In a nutshell, 3D tracking mode will use all the focus points available to track the object you are trying to photograph, whereas Dynamic mode divides the focus points into separate “zones”, activating only the surrounding focus points (as many as you selected).
-
Select “Shutter Priority” Mode
However, simply correcting the autofocus is not enough to get a sharp image.
To ensure that your photo isn’t blurred, you also need to set the proper shutter speed. For fast-moving athletes, it is better to use shutter speeds that are shorter than 1/250 sec.
The faster the athlete, the shorter the exposure is needed for a clear fixation on the photo. Therefore, the optimal mode for shooting sports is “shutter priority” (S) mode.
-
ISO and Shutter Speed Compromise
Let the camera automatically deal with ISO and aperture.
At such short exposures, the ISO will be very high, and we will have to find a compromise between the shutter speed and the ISO value.
It will not be so easy to set the shutter speed to 1/4000 s: the ISO will then have to be raised to a completely crazy level, and the frames will drown in digital noise.
Therefore, when shooting one of the tasks of the photographer – is to find a reasonable compromise between the length of exposure and photosensitivity.
Real Life Example:
I have a friend who shot figure skating competitions on an indoor ice rink. Obviously, the lighting was artificial and not very bright.
This made it challenging for him to find any balance – either ISO was very high or the shutter speed was slow.
After playing a bit with it, he decided to shoot at shutter speeds in the range 1/160 – 1/500 s and at ISO 1000-3200.
This is just an example that sometimes you’ll have to find a balance between the two in order to achieve the sharpest image possible.
In slow phases of movement, you can use slightly longer exposures.
- When you increase the shutter speed length, you decrease the ISO level.
- Decreasing ISO means decreasing the image noise.
- And the decrease in noise means that you will have a higher image quality.

Do you see how that works?
When shooting complex technical elements in sports, whether it is a jump of a figure skater or catching the moment in a hockey game, the exposure should be reduced.
-
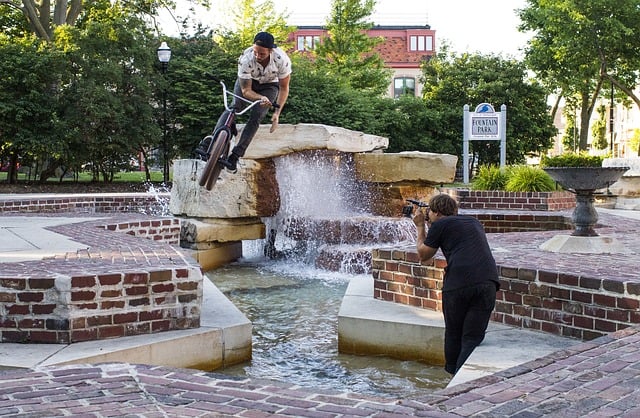
Continuous Shooting & The Use of Flash
Obviously, not always will an athlete look good when performing sports-related tasks.
For example, at the time of complex jumps, you can’t really control your facial expression and overall this is not the time when you will get the most picturesque poses during rapid movements.
Continuous shooting is what will help you capture one’s best moments. After shooting, in that series of frames, you will be able to find the best one.
It is unlikely that you’d have the same level of success with a single shooting.
Now, the attentive reader would probably notice that I didn’t say anything about the use of the flash.
Why?
This is because using the flash when shooting sports is not always appropriate.
1) First of all, most often the subject we are shooting is at a very great distance from us, so the flash won’t be helpful anyway.
2) Second of all, it doesn’t really work out with the continuous shooting because the flash will take too long to charge. As you already know with sports we need fast focusing and a high frame rate.
This leads us to the following question: “Which camera should I choose for sports photography?”
I have a separate article on sports photography gear, but if you’re in a hurry, here’s a quick table overview:
Image | Product | Reasons to Get It | |
 | 1. Canon T6i Great cheap DSLR for beginners |
| |
 | 2. Canon 7D II Best value in the Canon line up |
| |
 | 3. Nikon D500 Great for sports (under $2000) |
| |
 | 4. Sony a9 Official EISA Award winner |
| |
 | 5. Nikon D5 The best DSLR for pro level photos |
|
So, we figured out why during sports it’s important for the camera to have quick and accurate focus, fast continuous shooting, and an adequately-running auto mode system.
The ability to quickly adjust the necessary parameters such as shutter speed is also important.
Frankly, any modern DSLR will be suitable for these needs.
An excellent choice will be fast “reportage” cameras like Nikon D7100, Nikon D750 or Nikon D810.
(If you’re more into mirrorless options, consider Sony a9 with the right sports lenses.)
-
Sports Photography Lenses
Choosing the right lens for sports photography is more challenging.
The first thing we must understand is how far will the subject of photography be from us. Almost always when shooting sports, there are at a decent distance from photographers.
If this is so, then we will need a telephoto lens because its lenses give a magnified image.
For most cases, a 70-300 mm lens will be more than enough.
(To shoot soccer, you may need something even longer.)
-
Lens Aperture
The aperture of the lens is what’s very important.
This is what will allow you to take fairly short exposures in poor lighting.
Of course, the ideal option here will be telephoto lenses with an aperture of F/2.8.
For example, the gorgeous one is Nikon AF-S 70-200mm F/2.8G ED VR II or a slightly more affordable one is Nikon 80-200mm F/2.8 ED AF-S Zoom.
However, these lenses are usually not affordable for everyone.
Another disadvantage of these “photo monsters” is that they are big and heavy.
There are more inexpensive and compact camera models with a lower exposure output.
In the past, my friend used a lens that was twice as smaller and weighs half as much as the previous ones, but it loses a bit in terms of the aperture:
The most affordable option will be:
While among the mentioned lenses it is the lightest and compact and has quite a decent picture quality, it still loses to other DSLRs in terms of aperture.
Top 3 Platforms to Learn Sports Photography
Unlike previous photography genres, I won’t be sharing individual courses, but rather the e-learning platforms to learn everything for budding sports photographers.
I’ve chosen the sports catalog, so you can find the right classes faster. And if you ask me on which one’s the best, I think my favourite of these 3 would be KelbyOne (review here).
My Final Thoughts
Look:
I agree, it’s not easy to find the courage and passion to shoot in your own style, but it’ll be totally worth it once you find it.
All you need to stop trying to do what everybody is doing, and focus on being your real self.
Having a role model is good, but not at the expense of your originality.
Also, you don’t have to follow the norm as a photographer. Some rules are good, but not all of them. Go break them if it makes you a better photographer.
Always try to be adventurous and have the zeal to experiment with something new.
So:
Go ahead and shoot your pictures in a way that is close to your heart. And you’ll quickly find your snaps are getting noticed, appreciated and even applauded.
About Author
Zarina
Founder & content creator at Digital World Beauty. My main objective here is to create a valuable resource for photography enthusiasts with honest tech reviews, course recommendations, and how-to tutorials.
Thanks for the tips Zarina. I’ve been asking myself a lot of these questions and writing them down helps me to setup some goals and direction. I’ve been shooting sports for a while now and have decided to make it a business instead of a hobby. I do it because I love it.
Glad to help, Ray! Good thing that you decided to turn your passion into an income-generating business, congrats!
By the way:
Have a look at this post on making money with photography business that I’ve written a while ago. You might find it useful.
And yes, I feel you.
Since I’m in a long recovery after the accident/orthopaedic surgery, I’m not sure how soon I’d do it more professionally but having this website helped me share my knowledge and my interest through words instead.
By now, I might be better at this than practical photography! Haha