Why Does GoPro Split Videos and How to Stitch Them Together? (Guide)
This is a complete beginner’s guide on GoPro chaptering/video files being split.
Specifically:
- why does GoPro separate videos
- what is chaptering and the benefits of it
- how to stitch GoPro videos together
- how to merge/join clips in DaVince Resolve
- and lots more
So, if you’re ready to go “all-in” with GoPro chaptering and ways to merge the clips, then this post is for you. Let’s dive right in.
GoPro Splitting Videos? (Chaptering Explained)
When you are new to using a GoPro camera, chances are the camera’s function of splitting videos often leaves you scratching your head. You may think, “Why are the video files split on my memory card?” and “If I record for 30 minutes, then I should view a 30-minute long single clip, right?”
Well, GoPro answers this as a yes and no.
Yes, because you can playback the movie on your camera without interruptions or noticing any video cuts. No, because the camera’s split function segments long videos on your memory card via a process called chaptering.
-
Understanding Chaptering
Chaptering is the process by which a GoPro automatically splits lengthy recordings into segments by starting a new file on your memory card.
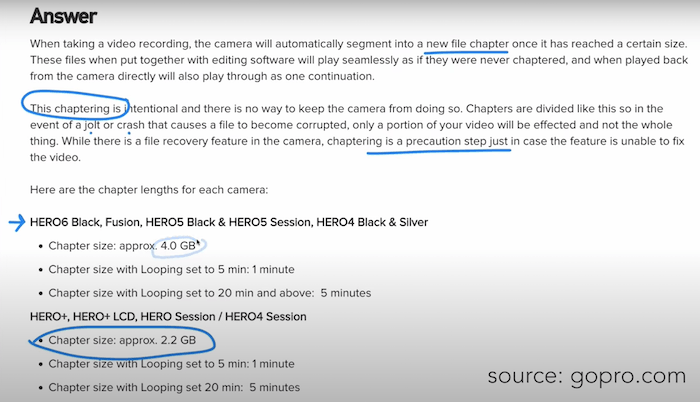
The camera typically conducts chaptering in 4-GB portions, meaning the process is about the size rather than length. As a result, your capture setting determines how long each 4-GB clip is.
For instance, lower settings can produce 12-minute or 17-minute long segments during the chaptering. In contrast, higher settings take up more space, leading you to have under 10-minute long videos from chaptering.
Although the process involves your action camera segmenting your videos, it does not mean that your camera stops recording between the clips. It automatically stops recording the current file and commences a new one on your memory card as your recording gets closer to the pre-determined 4-GB size limit.
Check out the brand’s official response regarding this:
It is easy to worry about losing data during the shift to the new file chapter.
However, since the camera does not stop recording, you do not lose any captured moments, and the subtle chaptering process does not leave any trace behind.
As such, you can play and enjoy your self-made cinematic film on the GoPro without encountering any glitches or interruptions, appearing as one long clip.
Nonetheless, if you take out the memory card and place it on your computer or laptop for editing, it will appear like segmented clips. For this reason, you need to stitch them together if you desire to edit or watch it as one long clip on the computer. Notably, you can edit the clips as they are without having to put them back together.
Different GoPro models have different chapter lengths, where HERO4 Black & Silver, HERO5 Black, HERO5 Session, HERO6 Black, and Fusion have a 4-GB limit. They also offer a 1-minute chapter size with a looping set for five minutes. You can get a 5-minute chapter size with your looping adjusted to 20 minutes and above.
==> Related reading: GoPro Hero 7 Black and GoPro Max Compared
The HERO4 Session, HERO Session, HERO+LCD, and HERO+ models have a smaller chapter size at around 2.2 GB.
-
Chaptering File-Naming System
Chaptering labels each clip it segments to make it more comfortable during editing. You can quickly identify the first file to the last to ensure you avoid accidentally mixing the segments and stitching a mismatched video.
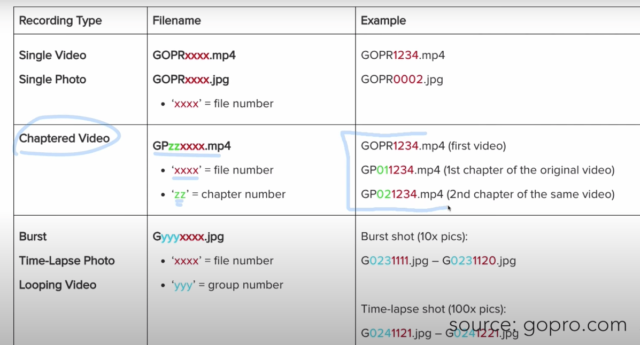
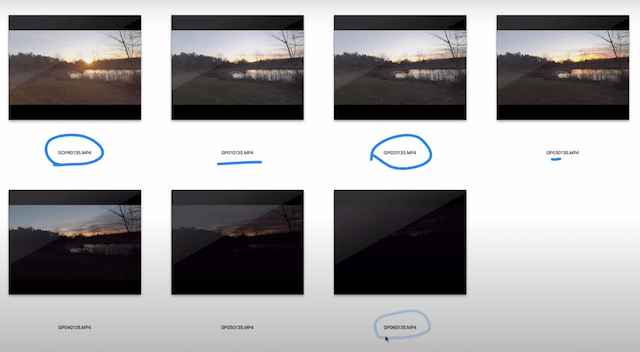
Generally, the standard chaptering file-naming system in your GoPro labels the first video, then the first chapter of the original video, followed by the second chapter of the same video. This sequence continues until it reaches the last chapter of the original clip.
The first one has the GOPR5678 label, the first chapter features the GP015678 tag, and the third has the GP025678 name, with the first two numbers after the GP increasing until your last recorded chapter.
It is advisable to begin by sorting your file names in a list format when dealing with many clips. Listing them chronologically or alphabetically ensures they are in the correct order for seamless and appropriate editing.
-
Benefits of Chaptering
As explained above, chaptering involves an automatic process by which the GoPro device segments into a new file upon reaching a specific memory card size.
It is an intentional process designed by the manufacturer to enhance the user experience by increasing safety. The divided file chapters improve security and prevent the total loss of your videos if you corrupt one of the segmented files.
For example, if you experience a crash or a jolt that corrupts the currently recorded file, your previously captured files remain safe. With this function, you can enjoy peace of mind because you do not have concerns about losing the entire recording and feeling like you wasted your day.
Even though the camera incorporates a file recovery feature into its design, chaptering offers a precautionary step to enhance protection when the feature malfunctions.
Aside from these, the systematic file-naming pattern makes it easy to track your segmented files, helping you avoid editing and stitching errors. It also aids in saving time, since you can quickly identify and put the files together for efficient edisting according to your needs.
How to Stitch GoPro Videos Together
Learning how to combine clips together is essential now that you understand why your GoPro splits its videos. The editing concepts are relatively the same across all apps and softwares.
(This also includes other cameras besides GoPro that make multiple segments/break it down into smaller clips.)
Thus you can comfortably stitch your videos by knowing where you can find the right tools, buttons, and features. For example, you can put together your movie using the DaVinci Resolve editing application.
-
How to Join Clips in DaVinci Resolve
It’s actually VERY easy to do. Below is a visual presentation on how to do it:
You can start by window-selecting two clips when you intend to join them. Hold the shift button and select multiple clips when dealing with longer recordings.
After this, right-click the selected portion and click on “New compound clip” on the dropdown menu. You can then name the window that pops up and click the create button, resulting in one clip stitched together from your earlier selections.
Notably, the program puts the merged clip in a media pool, which you can find in the top left corner. This function means you can swiftly access the merged video from the media pool for other editing purposes, depending on your requirements.
Each time you want to add additional clips to your merged videos, you can repeat the entire process by selecting the stitched version with the new clips you intend to incorporate.
Besides these, it is also vital to know how to break the movie apart if you join together an unwanted clip.
You start by right-clicking on the merged section, clicking on the “Decompose in place” option on the dropdown menu. This step breaks apart the clips for you, enabling you to remerge the sections you desire or edit them whichever way you wish.
-
Editing (Stitching) Software Platforms
Modern technology means you can find a wide selection of editing software for mobile and computer devices to help you put together your recorded clips.
You can find applications besides DaVinci Resolve to meet your editing needs, such as Premiere Elements or the GoPro-compatible Quik app.
Here are some editing software platforms for beginners and experienced users that you can utilize to put together your clips:
1. Quik App
This platform incorporates different editing software types called Quik for Desktop and Quik app for Mac and PC.
Additionally, you can find a Quik app for editing when using your phone, enhancing convenience when you cannot access your laptop. Quik offers several features that enable you to modify your recording’s color, trim, or crop according to your preferences.
You can get this app cost-free and access various functions such as importing footage from the camera to your laptop or updating your GoPro’s firmware. Nevertheless, it has limited editing capabilities that make it perfect for beginners seeking to understand and practice clip-stitching.
2. Adobe Premiere
You can get two quality platforms from Adobe, such as Premiere Elements and Premiere Pro (free trial available). They are compatible with PC and Mac systems, increasing convenience for various users.
Premiere Elements presents a more straightforward editing mode that enhances confidence for new users and an advanced setting to improve your editing skill. Premiere Pro supports advanced settings and software, making it perfect for experienced and professional users.
3. Final Cut Pro
Final Cut Pro for Apple is another platform with advanced software to suit professional and skilled users. If you own a Mac and are familiar with editing techniques, you can get this editing option and access the most advanced organizing tools for efficient and professional-quality results.
4. iMovie
iMovie is a free platform you can turn to when you own a Mac. Its excellent features make it suitable for advanced and beginner users. Moreover, it provides frequent updates to ensure the latest functions and technology for optimal editing performance.
Stitching GoPro Videos: FAQs
Q: How do you turn off chaptering on a GoPro?
You cannot turn it off. GoPro integrates the function into the camera to increase footage security by preventing total corruption of your recorded files. Chaptering ensures you only lose a portion of your video if a crash corrupts one of your files.
Q: Why does my GoPro only record for 5 minutes?
The brand’s chaptering function means the device automatically segments long video recordings into chunks that fit the set memory size. Therefore, you get 5-minute recordings because you selected your looping at 20 minutes or more, which generally produces 5-minute chapter files.
Q: How can you use Premiere Pro to join clips?
Premiere Pro (free trial available) joins clips in a few basic steps, leading to a nested sequence creation. You begin by creating a sequence, dragging and dropping the two segments you intend to merge into the workspace.
Next, you choose another clip and drop it onto the “New item” button, enabling you to form another sequence you can rename. After this, you can create your required nested sequence by dragging and dropping the original series onto the new sequence.
Notably, you can re-edit the nested sequence, with the changes automatically updated in other sequences.
Now…
I’d like to hear from YOU:
- what are your tips on merging the cut videos?
- anything else to add when it comes to chaptering?
- do you now understand why GoPro splits video files?
Any suggestions, comments, or recommendations are welcome in the comments below!
About Author
Zarina
Founder & content creator at Digital World Beauty. My main objective here is to create a valuable resource for photography enthusiasts with honest tech reviews, course recommendations, and how-to tutorials.