Why Is Lighting Important in Photography? (Different Types of Lighting Explained)

This is a complete guide to understanding light in photography (and film).
In this in-depth guide you’ll learn:
- the role and importance of lighting in photography
- different directions of light in photography (side, front, Rembrandt, etc)
- how to improve the quality of your images using these tips
- and lots more
So, if you’re ready to go “all in” with photography lighting, then this post is for you.
Importance of Lighting in Photography
First things first:
It doesn’t matter which camera you use. You can apply your knowledge of light both by photographing with a good digital camera and with a smartphone.
Why is lighting so important in photography? Photography and lighting go hand in hand. Simply put, if there is no light, there is no photography. It’s that crucial. And by using different lighting (and directions), we invoke different feelings in people.
Often budding photographers perceive light as a factor that influences the technical conditions of the shooting. In the event that they can’t appreciate all the possibilities of lighting, their work won’t have enough expressiveness. Uncertain lighting solutions have a negative effect on your images.
Here’s the the thing…
Impressions of objects, both in photography and in life, are created through lighting. Think about it: We know that the bright light of the sun gives us joyful sensations. We also know that twilight can have a peaceful effect, and the darkness is alarming on the psyche of the observer.
In other words, the type of light can manipulate a person’s consciousness, causing a variety of feelings. And as artists we WANT to invoke strong emotions in people.
In addition to the quality of the light, there are other things that you need to take into account when photographing/filming something.
For example, how the shadows fall, how contrasting they are, what is the pattern of chiaroscuro, how soft or hard the light is. Here are some light characteristics that a pro photographer should take into account:
- sources of light
- direction of light rays
- light intensity
- spectral composition of light
- color and texture of the illuminated object
The combination of these parameters allows you to obtain a wide variety of colour patterns. It’ll be pretty difficult for a beginner photographer to understand the intricacies of setting and evaluating lighting, but with time, learning, and practice you will get there.
By the way, because of his professional experience in Japan, Mark Hemmings shares a unique approach to lighting in his Digital Camera Mastery course for beginners.
Now, let’s talk about (types of) direction of light in photography. Since it’s extremely important, it’s what we’ll focus on the most in this post.
Direction of Light in Photography
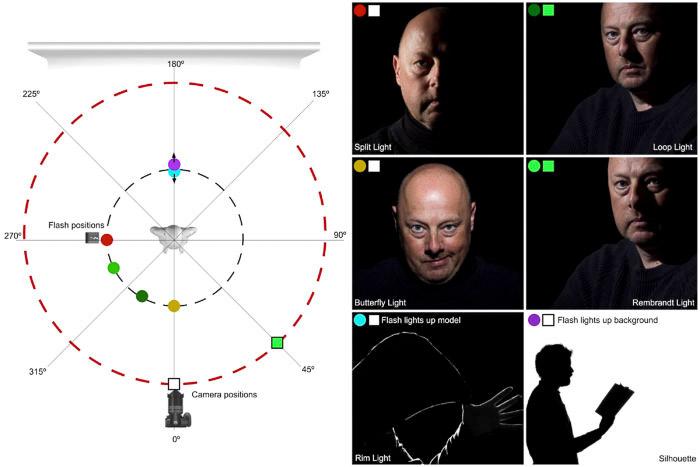
What is light direction in photography? How many types of those are there?
Let’s face it, it’s impressive how the direction of light can change a photograph. Have you noticed, for example, how the textures of an object or a portrait change simply by changing the angle at which the lighting falls on it?
If you’re passionate about portrait photography, I’m sure you’ve noticed how sometimes the portraits turn out to be spectacular, and at other times, we see how shadows create the least flattering effect.
The reason behind it is not only the intensity of light (for ex, shooting at noon vs golden hours), but also the orientation of it (which arguably is more important).
Six types of light direction:
Beyond the size of the light source or its intensity, which are equally important in terms of light shaping ability, in this article we are going to discuss the different types of light direction:
- Front
- Side lighting
- Rembrandt (shooting at 45º)
- Zenith lighting (shooting with a high angle/point of view)
- Nadir lighting (shooting with a low angle/point of view, against zenith)
- Rear or backlight
The direction of the light determines which part of the object or subject will be in shadow and which part will be illuminated. It also determines aspects such as volume or textures, so it is very important to know how to work with it to obtain the results we want in our photographs.
Now…
The orientation of the light can be classified according to whether we move the light source from a horizontal axis (the light moves sideways) or a vertical axis (the light moves up or down). Within this classification, several combined orientations are possible.
For example, a frontal illumination (movement corresponding to the horizontal axis) slightly overhead (movement corresponding to the vertical axis) would be a combination of both.

If we divide the lighting in these 2 segments, then in the horizontal orientation group we have front, lateral, semi lateral, and backlight; and in the vertical orientation group we have shooting from very low and very high angles/points of view.
Below we’ll talk about each of these.
1. Front Lighting
Front lighting is pretty self-explanatory. The light shines on the front of the object/subject (for example, when working with the camera’s built-in flash).
In this scenario we get the so-called flat images, since the object is illuminated evenly and there are no shadows that make us perceive the volume of the object. The textures are therefore minimized, which can be useful, for example, for portraits where we seek to eliminate “imperfections”.
The color with the frontal lighting is saturated and more detail is obtained, that is why it is the lighting that is used in the ID type of photos.
Pretty straightforward, right?
2. Side Lighting
In this case, the light source, be it natural or artificial, is placed to one side of the subject. This type of light orientation produces very strong shadows on the half of the face or part of the object that is not illuminated.
Given that with this orientation of the light, a lot of contrast is generated between lights and shadows, we have a great sense of volume and depth. This type of lighting is ideal for highlighting textures and increasing drama.
3. Rembrandt Lighting
Semi lateral type of lighting is located between the front and the side. With this direction of the light, you still achieve contrast and textures, but without such a dramatic effect as you see when shooting with side lighting.
Semi-lateral or 3/4 lighting is one of the most used by portrait and still life photographers, as it achieves textures and volume, as well as some drama, but being a more balanced and equally interesting and photogenic option.
It is based on 45º lighting from a somewhat sharp angle and achieves very characteristic portraits. You may also know this as Rembrandt style photography, which is widely used both in portraiture, in culinary or still life photography.
Here you can see a video of how Rembrandt lighting works and how you can achieve it:
4. Backlight
In this case, the light is located right behind the main subject. It is the light of the silhouettes, since you lose a lot of information in the mid-tones.
The harder the light, the more the silhouette will be enhanced, since the dynamic range of the camera does not allow the lights and shadows to be correctly obtained simultaneously, so you have to choose between a background or a correctly exposed subject.
By varying the angle of the backlight (approximately 135º) we can use it to outline our subject.
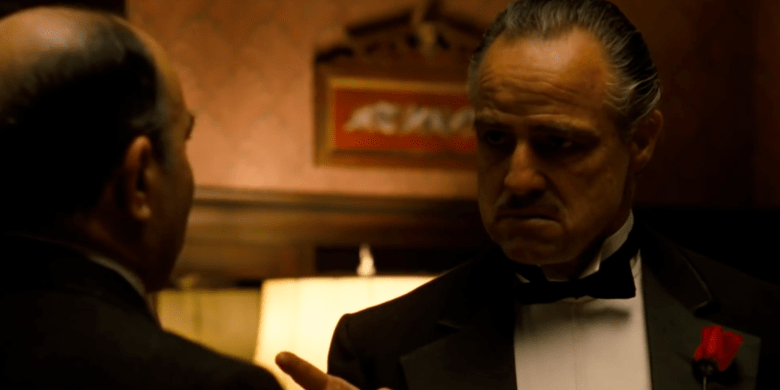
5. Zenith Lighting
The light source is positioned above the main subject or object. It is the sunlight when it is high (noon) or from all those lights that are above the main subject or on the ceiling of the rooms of any home.
When we use this type of light, we get very strong shadows. In portraits we get shadows under the eyes, nose and chin and, although we are used to it, it is not really a good option when photographing this genre.
Because of that, it’s usually a good idea to use a reflector to soften those annoying shadows on the face, or to try to find angles that are not so zenith by moving our subject or the lamp slightly.
Also, this type of lighting is quite common in the movies.
For example, if we take this scene from The Godfather, we will see how shooting with the lighting above the character’s head darkens the look and invokes a lot of emotions.
6. Nadir Lighting
So…
What is nadir? According to NLPIP, in the lighting discipline, the nadir is defined “as the angle that points directly downward, or 0°, from the luminaire”.
Basically it’s an illumination from a low point of view upwards. It’s the opposite of zenith that we discussed above, and this type is the least natural one in photography.
With this direction of light, very unreal shadows are created, totally opposite to the zenith. In portraits, shadows form above the chin, in the eye sockets, above the lip, etc. They are not at all flattering shades if you are looking for a standard portrait, but it can give you a lot of play if you want a sinister image. That is why this type of lighting is widely used in scary movies.
If we move from the vertical plane slightly to the sides, this very accentuated effect is reduced, and it makes this type of lighting less “radical”.
But of course, you don’t have to be strict with all these definitions, you can play around with different angles and get balanced results. You can make a frontal with a nadir effect, a side zenith, etc.
Combining Several Types of Lighting
Look…
We don’t always rely only on one light source, it’s totally possible to combine several of them. Actually I encourage you do that because by doing so, you can use the advantages of one type of lighting and correct the “disadvantages” of another.
When it comes to lighting, and photography in general, you have to be creative, not be afraid to experiment, and have a good dose of tolerance for frustration when starting out ?. It’s all a matter of practicing and having fun at the same time.
Right now, I’d like you to put you camera down and WATCH. Just look at the light, at its color, as it falls on people and objects. What shadows are created? Try looking at things at different times of the day. Train your eye.
Also, do a portrait session at home with the different basic directions of light.
It won’t take too much of your time, yet it’ll teach you how light behaves, what shadows look like, you will learn to control the settings and see how you can get the best results. Try this with whatever and whoever.
Because photography without practice makes no sense. You have to do this kind of exercises to get better at this craft. So find yourself a model (or object) that you can spend a little time on, a light that you can orient you have at home (for example a lamp) and start practicing. You will see how you are able to get more than one interesting photo.
Now…
I’d like to hear from YOU:
- what is your favorite type from this list?
- do you now understand the importance of lighting in photography and film?
Let us know your thoughts in the comments below!
About Author
Zarina
Founder & content creator at Digital World Beauty. My main objective here is to create a valuable resource for photography enthusiasts with honest tech reviews, course recommendations, and how-to tutorials.
I have studied basic and Fine Art Photography and I do have an understanding of how lighting works. Unfortunately every photo that I have saved on my devices are horribly altered and darkened beyond belief I do not use my phone to take pictures any more. I have limited my use of photography photos due to the quality of the images.