Sports Photography Under Floodlights: How to Take Action Shots Under Stadium Lights?
Welcome to my guide on how to take sports photos under stadium lights (at night)!
Have you ever wondered how photographers capture fast-paced action in low light? More specifically, how anybody could snap high detail sports pictures under such undesirable lighting conditions?
Anybody with a camera at a football or baseball game at night will have experienced this: your shots come out grainy, the subjects are a bit blurry, your levels won’t adjust properly, or a combination of all these issues and more.
Sports photography under floodlights can be very challenging, especially for beginners. Luckily, there are some ways on how you can go around this one quite easily as well. With the proper knowledge, gear, and techniques, you’ll be shooting night scenes effortlessly in no time!
In this post, we’ll talk about:
- the fundamentals of sports photography under floodlights,
- how to adjust the lighting in certain conditions,
- the necessary gears and accessories for lowlight shoots
- the post-production strategies,
…and so much more!
Let’s get the ball rolling, shall we?
What Is Sports Photography?
When it comes to sports, people come together regardless of age and gender, especially in games participated in by major leagues. It’s a crowd-bringer and definitely an opportunity for you to flash your photography skills.
But just what is sports photography? Well, to answer that quickly, it’s a genre that focuses on capturing athletic events.
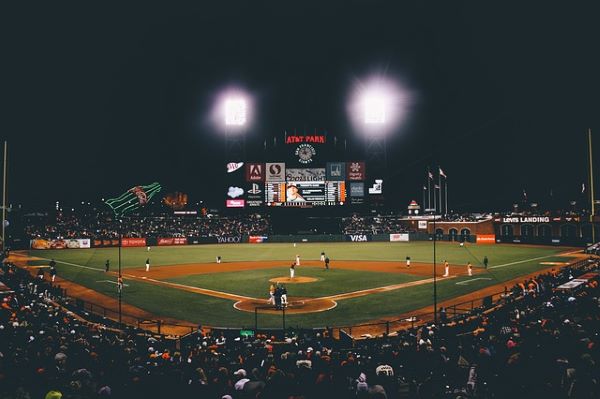
What sets this apart from other kinds of photoshoots is that it normally involves fast-paced action, not to mention low lighting conditions for major events. Take for instance soccer and football games. These are usually hosted during the night and there will be lots of actions happening altogether.
- Relevant reading: How to Sell Your Sports Photos Legally?
Though it’s fun to cover events like these, it can also be really challenging especially for amateurs. Taking decent photos of your favorite player this time might not be as easy as taking a picture with them backstage. You have to consider proper timing, lighting, and the capacity of your camera to freeze action.
So in case you ever want to go to that major league to snap some shots of your faves, this post will help you prepare the right things to bring and the correct techniques to follow.
How To Take Sports Photos At Night
As a photographer, you will run into a lot of situations where the lighting conditions are less than ideal. Not all of us can get by shooting Tennis matches exclusively, but that’s what makes this so exciting: the journey of capturing fantastic moments.
So here are some tips on how you can effectively get those magazine-worthy shots even during the night or in low-light venues.
-
Plan ahead
Planning your outdoor shoot goes a long way. Though you are not 100% guaranteed that everything will go the way you planned it, at least you can be confident enough to switch to plan B in case the original one is no longer possible.
If you want to cover a specific game, you’d probably want to check the specific schedule. After confirming the time, you can start off by checking weather forecasts, especially for those events held outdoors. This way, you’ll be able to prepare suitable gear for the shoot.
Another thing you have to consider is the photo hotspots in the venue. If you’ve been in that stadium or ballfield several times, you’d probably know where photogs line up and where the bad spots are.
These would typically be high-action spots. For example, with four-sided stages (basketball court, hockey rink,) the common photo hotspot is in the vicinity of the stage’s corners. These are the places where you can get the best shots during the entire game. This is where most of the “actions” happen.
For round or open stages, such as an FMX stadium or Motocross track, your options are a little more varied as the angles become much more of a subjective choice. Knowing the sport obviously helps. For instance, capturing side pictures of an FMX rider demands you pick a spot perpendicular to the ramp or slope.
-
Consider the lighting conditions
Another thing you need to consider is the lighting condition of the venue. If you are shooting during the daytime outdoors, then there wouldn’t be much of a problem since the sun’s natural light will help you a lot. But, it’s a different story when you need to photograph these games at night or indoors with poor lighting.
If you have access to the place before the actual game starts, it would be really helpful to survey the area and ask about the specific lighting setup so you can prepare for that as well. But if you don’t have that luxury, that’s still fine. Just check out where the stadium floodlights are and use them to your advantage.
Once you are well aware of the lighting setup, it will be easier to compose your shots this way. You’ll spend less time composing, so you’ll be able to get more images that could turn great in the end.
-
Assess your gear’s capabilities
Knowing how well your camera reacts to stadium lights will make it easier for you to plan your shoot. Why? Simply because you will know exactly what settings to use in order to make the best shots possible, even with the worst lighting condition.
If your camera doesn’t perform well in low light, you might need to experiment with setting it to different ISO levels to get the perfect balance between tolerable digital noise and acceptable exposure. Just make sure to test these settings before the actual game, or else, you’ll end up missing out on the most important shots during the event.
-
Pack the necessary accessories
Accessories are crucial for photoshoots like these. With low-performance cameras, you will need to bring an external flash to help with the light. If permitted by the host, you can even bring a complete set of lighting equipment for the event (this is usually allowed if you are hired to exclusively cover the event).
Another thing you might want to bring is a reliable tripod. Photographers often use telephoto lenses that are too heavy, so doing hand-held shots for three hours straight isn’t so practical. A tripod also helps lessen the camera shake that causes ugly blurs in your pictures.
Carrying spare lenses is also highly recommended. Though you might not have time to switch lenses when the game is on, you’ll probably be able to do it during timeouts and breaks, in case there’s ever a need for it.
Of course, never forget to bring extra storage cards. You don’t want to end up not getting the best moments because your storage is full. What a waste!
Lastly, you might want to consider bringing a backup camera, for “emergency” or spur-of-the-moment things, you know. This could be for purposes of easier switching from long shots to close-ups, too.
Important Gear for Lowlight Photography
Capturing sports shots is downright challenging, no doubt about that. And to add insult to injury, any photograph you see on a athletic blog or magazine seems effortless and pristine.
“How do they do it?” you might ask yourself. Well, you’ll be surprised at how easy this could be if you just know the right gears and accessories to use, plus the settings, of course.
I’ll share with you some of the top-rated gears you might want to consider for your next sports shoots. Ready?
-
Camera for action shots: Canon EOS 7D Mark II
When it comes to photographing sports events under the floodlight, having a reliable camera will go a long way. Right now, Canon EOS 7D Mark II is among the best options you can get for this type of photoshoot.
It has great dynamic ISO range, letting you capture the brightest and darkest moments without too much issues. Plus, it’s 20MP resolution ensures that every bit of detail gets taken into frame.
There’s a whole lot more good stuff about this camera. Read this review on the best sports camera this year!
I personally think it’s the best value in the Canon line up for sporting events.
-
Sports photography lens: EF-S 18-135mm
Of course, it goes without saying that the lenses should also be reliable, and powerful at the same time. Having a good camera is nice, but having an equally-capable glass will let you achieve those epic shot.
An EF-S 18-135mm can easily capture long distance shots, perfect for events like this. You don’t always get to have the privilege of getting near the players, so this helps a long. Plus, it’s fast so you can definitely freeze that awesome free throw or goal without much effort.
-
Memory cards
Storage is everything! When you ran out of it, you also lose the opportunity to take more awesome photos. So, best prepare good quality and fast memory cards so there’s no need to stop the shoot earlier than planned.
-
Monopod/tripod
This could be your lifesaver! (Or should I say hand-saver?). It would be very tiring to hold the camera continuously for the entire duration of the event. The longer you hold on to the gear, the heavier it gets. As a result, there will be more unnecessary movements and camera shakes that could ruin you shots.
Luckily, this can easily be avoided by bringing a tripod or monopod with you. Monopads are easier to use since you will still hold it by hand, though your reach might get a bit longer (serves as your arm’s extension). While tripods are very stable, yet harder to carry around and set up.
Either way, these two will help you focus more on shooting, rather than paying attention to your trembling hands.
-
Chargers and spare batteries
This is a must-have for every photographer, no matter what genre you are into. Bringing spares will definitely help you continue the session without much interruption. Of course, while you are using the other battery, it would be a good idea to charge the original one and prepare it for the next use.
-
Rain cover
This is optional, but quite useful without a doubt. Most times, sports competitions are held outdoors. With this, you can ensure that you can continue the shoot even if it rains, without risking your device.
Final Thoughts
If you’re about to go to your first match as a photographer, follow the tips mentioned above and you’ll get a head start in your portfolio. Once you master the art of shooting events at night or under field lights, covering sports evening events will be as easy as pie!
Just don’t forget to bring the right camera and accessories with you for a smooth photoshoot!
Now, I’d like to hear from YOU:
- Have you ever covered an athletic game before?
- How was the experience shooting sports photos under floodlights?
- Did you have difficulties in finding the best camera settings?
Let us know your experiences in the comments section below.
Sharing is caring!
About Author
Kate Janelle
Photography enthusiast and content creator at Digital World Beauty. My main objective here is to create a valuable resource for you with honest tech gear reviews, course recommendations, and how-to tutorials.