What Is Freelensing (Lens Whacking)? A Guide to Free Lens Photography
Welcome to my guide on what is freelensing and how to do it!
Have you ever wanted to take ethereal vignette photos without breaking the bank?
Well, you’re in luck! There exists a creative technique that practically anybody can use to propel their creative endeavours to the world of dreams and fantasy.
That sounds a bit hyperbolic, but trust me when I say freelensing is a great way to experiment with new photo compositions, effects, and shoots.
In this post, I’ll go over what freelensing photography is, how to take create photographs using the lens whacking technique, and some general tips and tricks to keep in mind.
(I’ll also include an FAQ at the bottom for any lingering questions you might have.)
How to Do Freelensing Photography (Video)
Chris Turner has an awesome video on how to free lens, with some excellent sample photos to share. Definitely have a watch!
So… What Is Freelensing?
Freelensing (or free lensing or lens whacking) is a method in film and digital photography that allows you to capture images with soft edges, light leaks, and alternate non-parallel depth of fields without mounting your lens.
If you’re familiar with tilt-shift photography, freelensing shares some similarity (if you’re not, check out this guide on what tilt shift lenses are and how they work.)
But the principal difference between the two is freelensing can be done with a majority of lenses, while tilt-shift photography is a technique specifically requiring tilt-shift glass.
Think of lens whacking as DIY tilt-shift photography. You can probably do it at home if you have a DSLR camera.
Why probably?
Generally speaking, you at least need your aperture to be independently controlled. In order to get the best results, you’ll need a 50mm prime (or less), and the ability to configure your aperture to infinity.
Some lenses’ aperture automatically closes when detached from the camera mount. You want your glass to remain open when detached so you can use this trick. Bonus points if you have a controllable focus ring.
That said, if your glass does not fit this description, you can use any old mechanical lens, or an automatic one with an adjustable aperture ring.
Now that definitions are out of the way, let’s get into…
Setting Up and Taking Photos
Alright, you’ve got your DSLR and your glass, and you’re ready to start lens whacking. First, let’s…
-
Adjust the settings
Since your glass will be detached the whole time, take the time to adjust your camera settings in advance so you’re not constantly mounting and dismounting your lens as you line up your shots.
With your lens mounted on your camera, pick an area and subject you want to photograph first, and configure your settings to this scene.
If you’re unsure of what settings to use, set your camera to Aperture Priority mode and half-press the shutter. Take note of the shutter speed and ISO values, then switch to Manual mode and dial those values in.
Next, turn on Live mode on your camera. Moving the glass around will make it annoying to look through the viewfinder when you’re focused on getting the right angle. Having your screen on facilitates lining up your shots.
After that, detach your lens and set the aperture to infinity. This ensures everything in your shot is in focus.
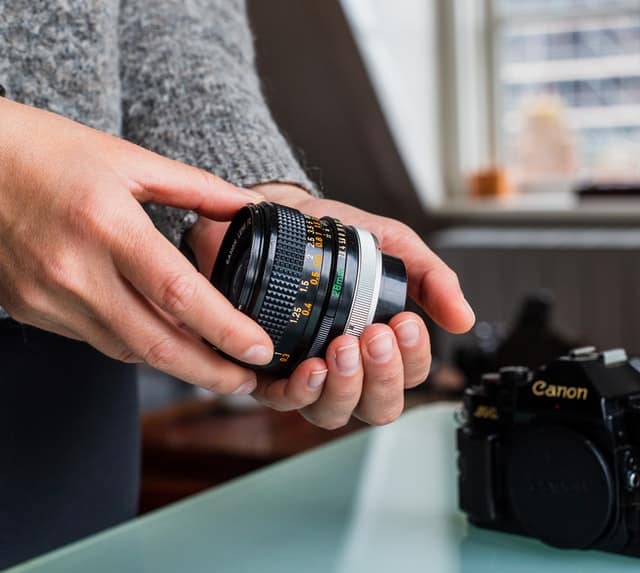
Finally, holding both camera body and lens in your hand, position the latter as close to the camera sensor as possible without mounting it. The idea is to shoot through the glass while giving it enough space to move around.
Now that the camera’s configured, our next step is to learn how to free lens. We start by…
-
Snapping some photos
How often do you take pictures with the lens unequipped?
Chances are: not that often!
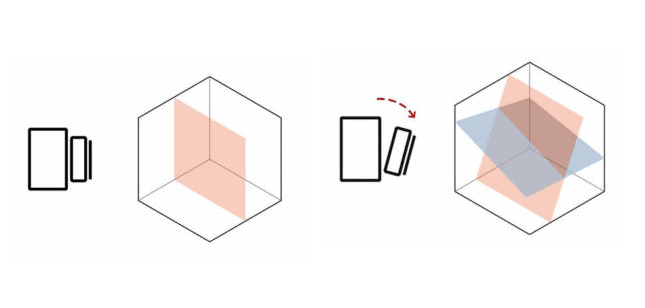
Looking at your screen, tilt your glass (or better yet camera body) around the sensor slowly and take note of the scene in front of you. You’ll see some vignetting around the edges where the lens meets the sensor’s line of sight. Some light might leak into the sensor, too, if there’s any light in front of you.
Tilting your screen also alters the plane of focus. This is because the depth of field (DOF) is changing in relation to the sensor.
One of the possibilities of freelensing is controlling the focal points of an image by tilting and moving your lens around. This allows you to create blurred spaces outside of what is directly in front of the camera, as demonstrated in this diagram:
It takes some getting used to, but the result is worth it.
Now move your lens away from the sensor. Do you notice how closer elements are more in focus than farther elements?
A rule of thumb with lens whacking is the farther an object is, the closer you move your lens to your sensor to get it in focus. The opposite is true, too.
Play around with these ideas and take a few shots. The light leaks can get annoying at times, but the right amount might enhance your photo a tad.
Pro tip:
Usually when doing trying this technique, people move the glass around. But if you want a neat trick, move your camera BODY, not the lens. It’ll be a true game changer for your creative photography.
Getting Better at Freelensing
Alright, you have the basics down, but you still want to get better. What else can you do to optimize this technique and shoot fantastical images?
Practice.
You hear it everywhere, but it’s true. Practice makes perfect.
Practice bears lessons on how to configure your settings faster, how to compose your shots more efficiently, how to maintain your gear for a longer life.
Speaking of which…
Let’s talk about dust.
It’s probably the first thing you thought of when I mentioned detached gear, right?
“Aren’t I exposing my camera sensor to harmful particles while free lensing?”
Well, that’s the catch. As unique as your photos will be using this creative photography technique, it does leave your sensor exposed.
It’s one of the reasons why setting up prior to detaching is so important. Ideally, you want to have your shots ready before you unmount your lens.
Of course, no one’s stopping you from walking around with an exposed sensor looking for good angles and good shots. It’s a big risk, so do at least avoid dusty and windy areas as much as possible.
Note:
Mirrorless camera owners, beware! The risk of contaminating your camera sensor is higher for you. Practice this technique at your own discretion, and seek a professional if you need a proper cleaning.
And on that note, let’s move on to some frequently asked questions.
Frequently Asked Questions
Q: Can’t you achieve this effect with tilt-shift lenses?
You certainly can, and in a way it’s safer for your sensor. The thing is that they cost thousands of dollars and unless you do specialized kind of work (like architectures), many won’t invest in this glass. But if you want to get a bit creative and achieve a tilt-shift effect, you can try the lens whacking technique.
Q: Freelensing vs. tilt-shift lens vs. Lensbaby?
Despite all producing non-standard imagery, they all function differently.
Lens whacking is essentially a DIY tilt-shift photography technique. It utilizes already existing glasses and some individual ingenuity to create unique compositions.
As the name suggests, tilt-shift are specially-made lenses that tilt and shift around the camera’s sensor. It produces similar-looking compositions to the lens whacking technique and mainly used for architectural work.
Lensbaby is commonly known as a brand of selective-focus optics. What does a lensbaby do? They are relatively inexpensive and they are unlike tilt-shift glasses in that they do not tilt nor do they shift. They use special mechanisms to create special effect images.
Each technique produces different (yet vaguely similar) images. Each also comes in different prices.
With freelensing, your selection is wide and varied. As long as they meet the minimum criteria of a manually adjustable aperture ring, you can lens whack all you want.
The other two, however, are specially-made. They have their own variety, but they also have their own functions.
==> Check out my Lensbaby review.
Q: Is it worth purchasing a new glass to lens whack? Can’t I use photo-editing software instead?
It depends on the person, but generally speaking, getting a new glass is only worth it if you know you’ll be using it as intended. It’s not financially viable to purchase a lens just to use it detached from the camera.
And while editing photos is always an option, and nobody can stop you from doing just that, a lot of the magic comes from snapping photos in the moment.
Wouldn’t you like to accidentally take a picture on a whim and capture a cool photo? I know I would!
DIY Tilt-Shift Photography: Thoughts?
Look:
Free lens photography is a fun way to experiment with different photo effects. Give it a shot if you want to capture some natural flares, vignettes, or just want to try out alternate planes of focus.
(Just make sure to keep your sensor clean!)
Now…
I’d like to hear from YOU:
- Are you going to try this DIY technique?
- Have you ever experimented with actual tilt-shift lenses?
Any questions, suggestions, recommendations? Let us know in the comments below!
About Author
Zarina
Founder & content creator at Digital World Beauty. My main objective here is to create a valuable resource for photography enthusiasts with honest tech reviews, course recommendations, and how-to tutorials.